Lesson 2.4: AutoFill and AutoSum
Objective:
In this lesson, we will explore two important features in Microsoft Excel that significantly boost efficiency in data entry and basic calculations: AutoFill and AutoSum. By the end of this lesson, participants should be able to utilize those features for rapid calculations and enhance efficiency in Excel’s tasks.
AutoFill in Excel:
AutoFill is a time-saving feature in Excel that automates the process of filling cells with a sequence or pattern based on a provided initial value. It intelligently extends the series, recognizing patterns such as numbers, dates, or text, reducing manual effort and potential errors in data entry.
To utilize AutoFill for data replication, follow these steps:
Position the Cursor:
- Place the cursor on the fill handle, a small solid square at the lower-right corner of the target cell.
Initiate AutoFill:
- Once the cursor transforms into a plus (+) sign, hold down the right mouse button.
- Drag the mouse across the desired cells to replicate the data in the intended series.
Steps to Use AutoFill:
Enter Data:
- Begin by entering the initial value or series in a cell.
Select the Fill Handle:
- Hover over the small square at the bottom-right corner of the selected cell (Fill Handle). The cursor changes to a black cross.

Drag or Double-Click:
- Drag the Fill Handle to manually extend the series or double-click it to fill automatically based on adjacent cells’ data.
Options:
- After dragging or double-clicking, an AutoFill options icon appears, offering choices like Fill Series, Fill Formatting Only, or Fill without Formatting.


AutoFill is particularly useful for numbered or dated sequences, as Excel intelligently recognizes patterns and extends the series.
AutoFill Sequences:
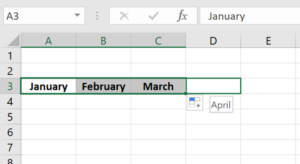
For sequences like months, weekdays, and hours, one example suffices. Follow these steps:
- Type the first element or the first two or three elements of the series.
- Select the cell(s) with the input.
- Hover over the fill handle until the cursor changes to a hairline plus sign.
- Click, hold, and drag to extend the series
AutoFill Formulas:
To use AutoFill with formulas, ensure the formula works correctly:
- Select the cell(s) with the formula.
- Hover over the fill handle until the cursor changes to a hairline plus sign.
- Click, hold, and drag to fill other cells. Excel adjusts the formula for the current row.
Note: To maintain constant references in formulas, use a dollar sign ($) before the reference in the Formula bar.
Example 1: Filling a Series of Numbers
Process:
- Enter the initial number in a cell (e.g., A1).
- Hover over the fill handle (small square at the lower-right corner of the cell) until the cursor becomes a plus (+) sign.
- Click and drag the fill handle to extend the series.
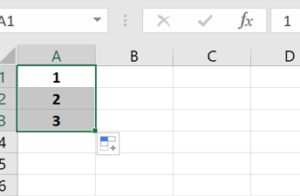
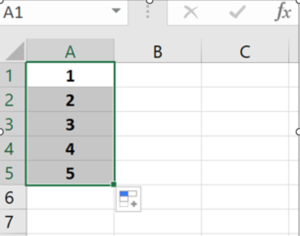
Example:
- Enter “1”& “2” in cell A1 & A2.
- Drag the fill handle down to fill cells A3, A4 and so on.
- Excel automatically completes the series: 1, 2, 3,4,5 …
Example 2: Creating a Series of Dates
Process:
- Enter the initial date in a cell (e.g., B1).
- Hover over the fill handle until the cursor becomes a plus (+) sign.
- Click and drag the fill handle to extend the series.
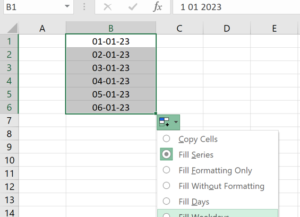
Example:
- Enter the date 01-01-23 into cell B1.
- Select cell B1 and drag the fill handle down to fill cells B2, B3, and so on.
- Excel automatically completes the series: 01-01-23, 02-01-23, …
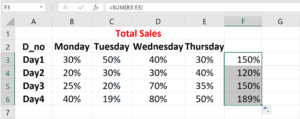
Example 3: Auto-fill the =SUM formula
Process:
- Select your target cell & enter a formula in a cell (e.g., F3).
- Hover over the fill handle until the cursor becomes a plus (+) sign.
- Click and drag the fill handle to extend the formula.
Example:
- Enter “=SUM(B3:E3)” in cell F3 (sum of values in B3:E3).
- Drag the fill handle down to copy the formula to cells F4, F5, and F6.
- Excel automatically adjusts the cell references in the formula.
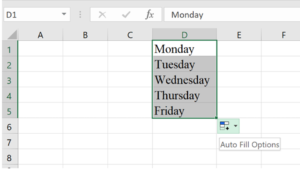
Example 4: Filling Weekdays
Process:
- Enter the starting day in a cell (e.g., D1, e.g., “Monday”).
- Hover over the fill handle until the cursor becomes a plus (+) sign.
- Click and drag the fill handle to extend the weekdays.
Example:
- Select cell D1 and Enter “Monday” in cell D1.
- Drag the fill handle down to fill cells D2, D3, and so on.
- Excel AutoFill automatically fills in the day names.: Monday, Tuesday, Wednesday, …
Auto Fill in Excel is a versatile tool that can save time and reduce errors in data entry, making it a valuable feature for various applications.
AutoSum in Excel?
AutoSum is a convenient feature in Microsoft Excel that allows users to automatically generate a sum formula for a selected range of cells. Instead of manually typing out the formula, AutoSum smoothens the process, saving time and reducing the possibility of errors in basic calculations.
- Adding is the most common math operation performed in Excel. The Home ribbon includes an AutoSum(Σ) button for adding. This button provides a shortcut to typing formulas.
 Figure: AutoSum in ribbon
- The AutoSum function in Excel provides a swift and efficient method for summing numbers within a continuous range, contributing to expedited financial analysis. To access AutoSum, users can simply type ALT + = in a spreadsheet, prompting Excel to automatically generate a sum formula.
- To quickly calculate the sum of values in a range of adjacent cells, you can utilize the Autosum feature available on the standard toolbar.
Process to check the AutoSum feature:
- Select the cell where you want the sum to appear, ensuring it is outside the cluster of cells whose values you want to add.
- Locate and click the Autosum button, often represented by the Greek letter sigma (Σ).
- Highlight the group of cells that you want to include in the sum.
- Press the Enter key on your keyboard or click the green check mark on the formula bar to complete the operation.
Calculating Monthly Expenses (An example):
Let’s say you have a personal finance spreadsheet where you track your monthly expenses in different categories. You want to use the Autosum feature to quickly calculate the total monthly expenditure. Here’s a step-by-step guide:

Figure: Practical Example of AutoSum
Open the spreadsheet containing your monthly expenses data. For example, you might have columns for categories like “Rent,” “Utilities,” “Groceries,” and so on.
Navigate to the Total Cell:
- Identify the cell where you want the total monthly expenditure to appear. Let’s assume you want this total in cell B9.
- Click on cell B9 to activate it. This is where the Autosum result will be displayed.
- Access the Autosum Feature:
- Look for the Autosum button on the toolbar. It’s often represented by the Greek letter sigma (Σ).
- Click the Autosum Button:
- Click the Autosum button to activate the feature.
- Highlight the cells containing your monthly expenses. For example, if your expenses are listed in cells B2 to B9, highlight this range.
- Press Enter or Click Check Mark.
- After highlighting the range, press the Enter key on your keyboard or click the green check mark on the formula bar. This action will execute the Autosum function.
By following these steps, the spreadsheet will automatically sum up the values in the selected expense range, providing you with the total monthly expenditure in cell B9. This real-world example demonstrates how Autosum can simplify the process of calculating totals in a practical scenario.
Key Features and Benefits:
Quick Accessibility:
- Access the AutoSum function effortlessly by utilizing the keyboard shortcut ALT + =. This eliminates the need for navigating menus or using the mouse, enhancing overall speed and efficiency.
Automated Formula Creation:
- Upon activation, AutoSum generates a formula that sums all numbers in a contiguous range, whether arranged vertically or horizontally. This eliminates the manual task of typing out the formula or using arrow keys to select the range.
Time Efficiency for Financial Analysis:
- For financial analysts engaged in extensive calculations, even a marginal increase in the speed of a single function, such as AutoSum, translates into significant time savings. The cumulative effect of these time savings can be substantial over the course of a day, week, or year.
How to Implement AutoSum in Excel: AutoSum Implementation Simple process:
- Enter Data: Input your numerical data into a column or row in Excel. For example, let’s use cells A1 to A5.
- Select Cell for Sum: Click on the cell where you want the sum to appear. For instance, select cell B1.
- Navigate to AutoSum: Go to the “Home” tab on the Excel Ribbon.
- Click AutoSum:
- Look for the “AutoSum” button in the “Editing” group. It often looks like the Greek letter sigma (Σ).
- Click the AutoSum button. Excel will automatically suggest a range based on adjacent cells with numerical values.
- Adjust Range (if needed): If the suggested range is incorrect, you can manually adjust it. Simply drag to select the desired range or type the range directly.
- Press Enter: Once the range is selected, press Enter to complete the calculation.
These two features, AutoFill and AutoSum, significantly contribute to smoothing your workflow in Excel, making data entry and basic calculations more efficient and accurate.