Lesson 3.1: Formatting Text in Excel
Objective:
The motive of this Lesson 3.1 is Formatting Text in Excel. This lesson will familiarize you with essential skills related to formatting text in Microsoft Excel. From here you will learn proficiency in altering font styles, sizes, and colors. Additionally, learn how to apply these text formatting techniques to enhance the visual attractiveness of your worksheets. However, by the end of this session, you’ll have a basic understanding of formatting text effectively and enhancing the overall representation of your Excel data.
In Excel, the Home tab offers tools like font modifications, cell styles, and formatting options that simplify the process of enhancing data presentation. Conditional formatting and color coding enable the highlighting of important data points, making it easy to identify trends, outliers, or specific values. Importantly, Excel formatting comes after the necessary steps of data preparation, including cleansing, organizing, enriching, and standardizing for analysis. It’s the final touch that ensures the information is not just clear but also visually coherent and easily comprehensible.
Formatting Text in Excel:
Most fundamental key points about Excel Text Formats:
- Excel text formats determine the visual presentation and organization of textual data in your worksheet.
- They provide control over how text looks, including font style, size, color, and alignment.
- Text formats influence how information is displayed within cells, enhancing readability.
- You can use text formats to emphasize or categorize information, making it stand out or align with specific themes.
- Applying appropriate text formats ensures clear and effective information representation.
Text formatting in Excel can be broadly categorized into two main groups: Font and Alignment. Each group offers a diverse range of options for formatting text values, each with its own significance. For example, the Font group encompasses various text font-related choices, while Alignment focuses on organizing and adjusting the placement of text within cells.
So, In the Home tab, you can access a variety of text formatting tools. The Clipboard section is not included in this context, as it primarily focuses on cut, copy, paste, and Format Painter functionalities.
How Text Formatting Works in Excel:
- Selecting Cells: In Excel, you have the option to change the default text font to various available fonts. Similarly, cells can contain text values that can be inserted according to your preference.
- Accessing Formatting Options: Navigate to the Home tab on the Ribbon, where you’ll find a range of formatting tools in the Font, Alignment, and other groups.
- Applying Formatting: You can utilize the available options to modify the text. For example, you can change the font style, adjust the font size, make text bold, italicize, underline, or change the font color.
- Alignment and Wrapping: For modify the alignment of the text, both horizontally and vertically, to enhance its positioning within cells. You can also enable text wrapping to control how text flows within a cell.
- Conditional Formatting: So, using conditional formatting to dynamically alter the appearance of text based on specific conditions or rules. This can include color scales, data bars, and icon sets.
So we can apply text formatting using a example:
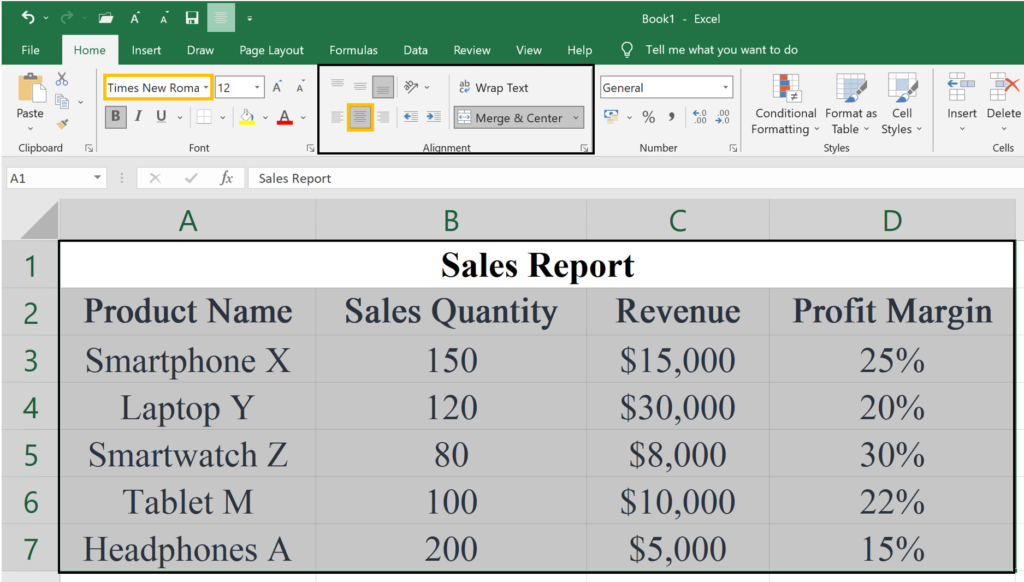
Text format in Excel is all about how text looks within cells—its style, size, color, alignment, and more. Let’s say you work for a retail company, and you have received a sales report containing data on various electronic products. Your goal is to enhance the report’s readability, and professionalism using Excel formatting and styling techniques.

Figure: Dataset without applying any format
Now, let’s apply some text formatting in this worksheet:
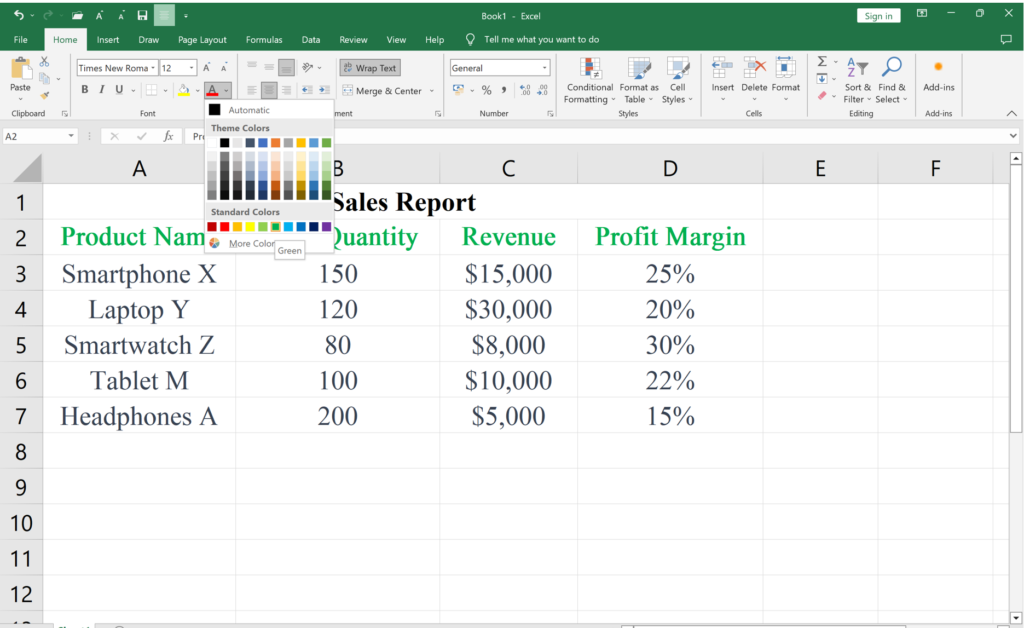
Here, text appearance, text color and conditional formatting are applied in the above example. Accordingly, you can apply other formatting as well.
- Text appearance: The Text font is changed from “Calibri” to “Times New Roman” and the center alignment is in all content.
- Alignment: Here, we applied an Alignment center in all content for better readability.
- Color: Select the second row and make all column header names green color.
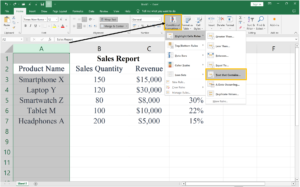
Now try to Applying Conditional Formatting Product Name in column “A”
Containing Specific Text:
The target is to highlight products with specific criteria (for example: contains “Phone” word) in the “Product Name” column. Here,
- We select the “Product Name” column.
- Then from the ‘Home’ tab, click on ‘Conditional Formatting’ in the ribbon and choose ‘Highlight Cells Rules’ and then click on ‘Text that Contains.’
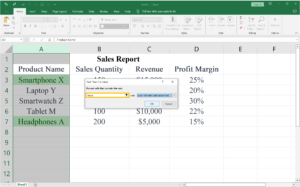
- Enter the specific text to be contained. In our example, we used the word “Phone” word.
- Set the formatting style for matching text. In our case, we select “Green Fill with Dark Green” style.
- Finally click ‘OK.’
Read all the instructions and try to do them practically. Suppose, you have been given a sales report dataset containing various categories of products similar to the example you just have learned. Similarly, your task is to apply text formatting techniques to the “Category” column to make the categories more visually appealing and distinguishable.
Consider the initial sales report dataset:
| Category | Sales Quantity | Revenue | Profit Margin |
| Electronics | 150 | $15,000 | 25% |
| Apparel | 120 | $30,000 | 20% |
| Home & Garden | 80 | $8,000 | 30% |
| Beauty | 100 | $10,000 | 22% |
| Sports | 200 | $5,000 | 15% |
Instructions with possible tasks:
- Bold Text:
- Objective: Emphasize the category names.
- Instructions: Select the “Category” column, go to the ‘Home’ tab, and click on the ‘B’ (Bold) button.
- Italic Text:
- Objective: Add a stylistic touch to the category names.
- Instructions: Select the “Category” column, go to the ‘Home’ tab, and click on the ‘I’ (Italic) button.
- Underline Text:
- Objective: Provide additional emphasis to specific categories.
- Instructions: Select the “Category” column, go to the ‘Home’ tab, and click on the ‘U’ (Underline) button.
- Font Color:
- Objective: Differentiate categories using different font colors.
- Instructions: Select the “Category” column, go to the ‘Home’ tab, click on the ‘Font Color’ dropdown, and choose a color.
- Text Case (Upper and Lower):
- Objective: Standardize the case of the category names.
- Instructions: Select the “Category” column, go to the ‘Formulas’ tab, use the ‘UPPER’ or ‘LOWER’ function to convert the text case.
- Text Alignment:
- Objective: Adjust the alignment for better visual presentation.
- Instructions: Select the “Category” column, go to the ‘Home’ tab, and use the alignment options (left-align, center, right-align).
The lesson covers a range of formatting techniques, including font styling, size adjustments, and color application for text. Emphasis is placed on the use of cell styles, alignment options, and conditional formatting to enhance the overall visual appeal and clarity of data. Through practical exercises, participants develop proficiency in formatting skills, ensuring that their Excel workbooks not only function effectively but also present information in a polished and professional manner.